Summary
Creating An SRV record simplifies the connection process for players accessing a Minecraft server through a custom domain name. By defining the hostname and port of the server, players can access it with ease. The guide below will walk server admins through setting up an SRV record using the cPanel. Creating an SRV record in cPanel ensures your Minecraft server is effortlessly accessible. For servers with a dedicated IP, go here to create an A record instead.
| Note | In order to connect to the server using a domain or a subdomain, create an SRV Record. Please note that this is only if the server does not have a dedicated IP. If the server does have a dedicated IP like Premium Minecraft Servers or Budget Servers with a dedicated IP addon, create an A record instead. Please see that tutorial here. Please keep in mind that after this tutorial it might take a while to start working due to DNS needing to update. |
How to Create an SRV Record for Minecraft in cPanel
1. Log in to cPanel.
2. Under the Domains category, select Zone Editor.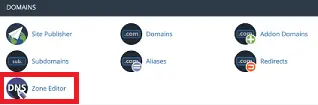
3. Next to any domain, click +A Record button.
4. Enter the subdomain of choice. This example is pointing play.myawesomeserver.com to the server's IP).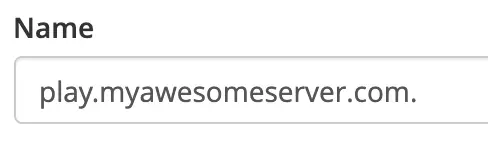
5. Enter the server IP address.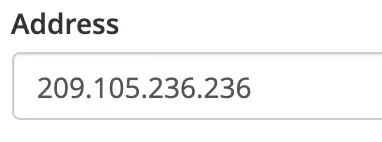
6. Click Add An A Record.![]()
7. Click on Manage.
8. Click Add "SRV" Record under the Add Record button.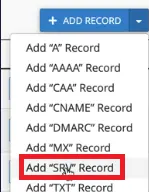
9. Fill in the fields with the following information:
Name: Should be the desired subdomain along with the protocol/service. In this tutorial, it’s _minecraft._tcp. It will autofill the rest of the domain after next text box. If yourdomain.com without a subdomain is desired, enter: _minecraft._tcp.
TTL: Use 14400. Other values can be used if the user knows exactly what this is, and how to use it.
Priority: Use 0. Other values can be used if the user knows exactly what this is, and how to use it.
Weight: Use 5. Other values can be used if the user knows exactly what this is, and how to use it.
Port: This should be the port the server is running on. (ie., 25586, 25598, etc.)
Target: Enter play.myawesomeserver.com (this will be the same from step 4)
10. Click Add Record.