Summary
Whitelisting is essential for Minecraft server owners to control who can access and play on their server. By creating a whitelist, server owners can restrict access to only those players who have been approved and added to the whitelist. It is helpful for private servers or servers that want to ensure a certain level of community involvement. Keep in mind that whitelisting in-game requires OP permissions.
How to Whitelist a Minecraft Server (Server)
1. Log in to the BisectHosting Premium or Budget panel.
2. Select Server Properties on the left.
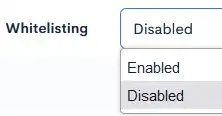
3. Locate Whitelisting and choose to enable or disable from the dropdown menu.
4. Scroll to the bottom and hit the blue Save button.![]()
5. Restart the server.
How to Whitelist a Minecraft Server (In-game/Console)
1. Run the following command to turn on whitelisting:
In-game: /whitelist on
Console: whitelist on
2.Run the following command to turn off whitelisting:
In-game: /whitelist off
Console: whitelist off
How to Add or Remove a Player from the Whitelist
1. Run the following command to add players to the whitelist:
In-game: /whitelist add <playername>(ex: /whitelist add Steve)
Console: whitelist add <playername> (ex: whitelist add Steve)
2. Run the following command to remove players from the whitelist:
In-game: /whitelist remove <playername> (ex: /whitelist remove Steve)
Console: whitelist remove <playername> (ex: whitelist remove Steve)
| Note | You can additionally run /whitelist list to view the full list of whitelisted players. |


