Summary
Installing custom maps on a Killing Floor 2 server enhances the gaming experience by providing various environments and challenges, keeping gameplay fresh and engaging for players. Custom maps can introduce unique designs, themes, and layouts unavailable in the standard maps, catering to different player preferences and strategies. Additionally, they foster a creative community, allowing players and map creators to share and enjoy new content, contributing to the game's longevity and replayability.
How to Install Custom Maps on a Killing Floor 2 Server
1. Choose the desired public Killing Floor 2 workshop map collection here. Or learn how to create a Workshop Collection here. ![]()
2. Copy the desired workshop map collection ID from the page URL.![]()
3. Log in to the BisectHosting Games panel.
4. Stop the server.![]()
5. Go to the Startup tab.![]()
6. Enable the Workshop Collection ID field and paste the ID from Step 2.
7. Start the server.![]()
8. Wait for the server to install the maps fully.
| Note | If the player receives an error trying to auto-download the map, subscribe to the workshop map manually. |
9. Access the Web Admin panel. Learn how to here.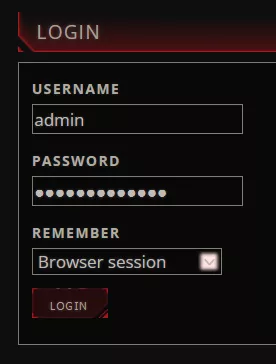
10. Under Settings, go to the Map Cycles tab.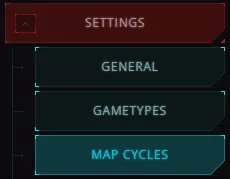
11. Select the active Map Cycle.![]()
12. Click Manual Add.![]()
13. Enter the name of the desired custom map from Step 1 and click OK.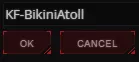
| Note | A server with more than 519 maps in rotation will cause the server to break. |
14. Press the Save Map Cycle button.![]()