(Estimated Read Time: 12 Minutes)
Stardew Valley is filled with
important choices as players progress, but few have a greater impact than the professions you select. So, today, we explore each of the Stardew Valley professions, what they offer, and which are generally considered the best to pick!
Stardew Valley Professions Guide (Update 1.6.9)

Farming

Level 5
- Rancher: Animal products worth 20% more.
- Tiller: Crops worth 10% more.
Starting off with farming, players will be met with a choice between rancher and tiller at level 5. Tiller is almost always the best choice in this instance as animals struggle to compare when it comes to profit, even in saves with a lot of animals. Tiller also applies its bonus to more than its description would suggest, including
flowers and any fruit that was not foraged.
Adding the fact that tiller leads to artisan, arguably one of the best bonuses in the game, it is hard not to recommend.
Level 10
- Rancher - Coopmaster: Befriend coop animals quicker. Incubation time (for Incubator, Ostrich Incubator, and Slime Incubator) cut in half.
- Rancher - Shepherd: Befriend barn animals quicker. Sheep produce wool faster.
- Tiller - Artisan: Artisan goods (wine, cheese, oil, etc.) worth 40% more.
- Tiller - Agriculturist: All crops grow 10% faster.
Assuming tiller was selected at level five, we recommend going with artisan next. Wine is one of the
best ways to make money in the game, and the presence of artisan gives more reason to craft and sell a variety of goods, especially from the animals who lost out on the initial rancher buff.
In comparison, agriculturist is sorely lacking. One could make an argument for it being better early game, but even then, it is convenient at best. We would only recommend agriculturist for players who have no intention of crafting artisan goods and plan to simply sell the crops they farm.
As for those who went with rancher, we would recommend shepherd next. The wool bonuses are nice to have, and barn animals are usually worth more than coop animals. Incubation is also done less and less as the game continues to progress.
Mining

Level 5
- Miner: +1 ore per vein.
- Geologist: Chance for gems to appear in pairs.
When it comes to the mining skill opinions can be pretty diverse, so personal preference will be important for the final choice. Miner is fantastic in the early game for getting better tools quickly while geologist gives
rare gems, including diamonds, a chance to be double drops. Our recommendation is miner, at least for the early game, but you really can’t go wrong with either.
Level 10
- Miner - Blacksmith: Metal bars worth 50% more.
- Miner - Prospector: Chance to find coal doubled.
- Geologist - Excavator: Chance to find geodes doubled.
- Geologist - Gemologist: Gems worth 30% more.
For those that ended up going with miner, we would recommend prospector for the next choice as an abundance of coal is needed for all those ores. However, that recommendation is not to suggest blacksmith is without its uses either. In the late game, selling
iridium bars can lead to quite the profit, but late game should be emphasized. Starting with prospector and then switching if desired typically ends up being the better option.
Geologists have a little more of a clear-cut choice with gemologist, which boosts the value of not only gems but minerals too. This makes crystalariums all the more worth it. Excavator held a lot more value in earlier versions of the game, but now we would really only recommend it for completing the museum faster.
Foraging

Level 5
- Forester: Trees drop 25% more wood.
- Gatherer: Chance for double harvest of foraged items.
There is
no shortage of trees in Stardew Valley, making forester not the best right out of the gate. Meanwhile, gatherer has a chance to double foraged items, which can lead to some free stamina regeneration and even double truffles. It’s sadly hard to “root” for forester given the disparity between these options, especially considering forester leads to two specializations that are not the best either. For these reasons, we recommend gatherer.
Level 10
- Forester - Lumberjack: All trees have a chance to drop hardwood.
- Forester - Tapper: Syrups worth 25% more.
- Gatherer - Botanist: Foraged items are always highest quality.
- Gatherer - Tracker: Location of forageable items revealed.
We recommend that those who selected gatherer go with botanist next. This very valuable perk applies to forageable items both in the wild and produced on the farm. Additionally, it makes picking up forageable items while out and about take up less inventory space since they will always be of the same quality.
Tracker is nice for quality-of-life purposes, but it provides nothing one can not already find given some extra time. However, some value still lies in tracker for helping complete the museum faster.
For our foresters, lumberjack is typically the better option. Extra hardwood can, at the very least, be useful to have around while
syrups still sell for very little, even with tapper. That is also putting aside that syrups are better used for crafting than they are selling.
Fishing

Level 5
- Fisher: Fish worth 25% more.
- Trapper: Resources required to craft crab pots reduced.
Fishing is a little different as the choices rely more so on playstyle and preference over one profession being better than the other. For players that
enjoy fishing even in the slightest, or at least intend to fish a decent amount, fisher would be our recommendation. The boost in value for fish results in a lot of extra income, especially in the early game.
For players who do not enjoy fishing and intend to avoid the mechanic as much as possible, trapper would likely go a lot farther. Fisher is the better choice, but it does not matter how great a perk is if it will never see use.
Level 10
- Fisher - Angler: Fish worth 50% more.
- Fisher - Pirate: Chance to find treasure doubled.
- Trapper - Mariner: Crab pots no longer produce junk items.
- Trapper - Luremaster: Crab pots no longer require bait.
Fishers will now find themselves with a choice between angler and pirate, which are both great for their own reasons. From a pure profit standpoint,
angler wins out, but many players opt for pirate as loot boxes tend to be more fun and can result in great gear, exciting items, and early iridium. We recommend angler due to its greater potential for profit, but there really isn’t a wrong choice between the two.
We would recommend trappers go with mariner to completely eliminate junk items from their crab pots. This greatly increases profit and makes crab pot investments much more worth it. Luremaster is convenient, but the money saved on bait is less than what would have been made with mariner.
However, should convenience or junk items for the recycler be valued over the potential profits, don’t let our suggestions stop you from picking what would make your experience more fun.
Combat

Level 5
- Fighter: All attacks deal 10% more damage. (+15 HP)
- Scout: Critical strike chance increased by 50%. (+0 HP)
Fighter and scout tend to be the professions most players struggle to pick between and for good reason. We recommend going with fighter for the flat damage increase and boost to health. Scout is a bit misleading as it does not increase one’s critical strike chance from 2% to 52%, but rather, it provides a 50% boost to one’s current crit rate. For example, a crit rate of 2% would increase to 3% with scout.
Due to how rare crits remain even with the perk, it is hard to recommend scout unless you are knowingly going for a very
crit-focused gear set or want to make use of acrobat’s lower special move cooldowns at level 10.
Level 10
- Fighter - Brute: Deal 15% more damage. (+0 HP)
- Fighter - Defender: +25 HP.
- Scout - Acrobat: Cooldown on special moves cut in half. (+0 HP)
- Scout - Desperado: Critical strikes are deadlier. (+0 HP)
We recommend those who went with fighter to continue with brute to boost their damage even further. After all, the faster
an enemy dies, the less damage it can deal. Defender typically is not worth it due to items like an iridium band more than making up for the lack of HP.
As for those who went with scout, acrobat would be our recommendation for guaranteed value from special moves. However, if special moves are something you never use, going all in with desperado to double crit damage would be the better play, despite how rare crits remain.
How to Change Stardew Valley Professions
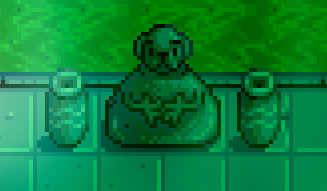
After selecting at least one profession and unlocking
the sewers, players can venture inside, where they will find the statue of uncertainty. Upon donating 10000 gold, the statue will prompt its generous donor to select one skill. That night, after heading to bed, the “Choose a Profession” screen will appear for the skill picked in the sewers, allowing a new set of Stardew Valley professions to be locked in.
 After selecting at least one profession and unlocking the sewers, players can venture inside, where they will find the statue of uncertainty. Upon donating 10000 gold, the statue will prompt its generous donor to select one skill. That night, after heading to bed, the “Choose a Profession” screen will appear for the skill picked in the sewers, allowing a new set of Stardew Valley professions to be locked in.